Many of you have likely seen the International Space Station (ISS) shining brightly as it passes through the evening sky. It’s amazing to think that bright dot is a fully equipped station with astronauts onboard. But wouldn’t it be even better to see it up close?
Manually tracking the fast-moving ISS with a telescope is nearly impossible, but with the latest firmware for the TTS-160 Panther Mount and the Skytrack app, your telescope can do the tracking for you. This gives you plenty of time to enjoy a detailed view of the station, including its massive solar panels.
Read on to learn how it works!
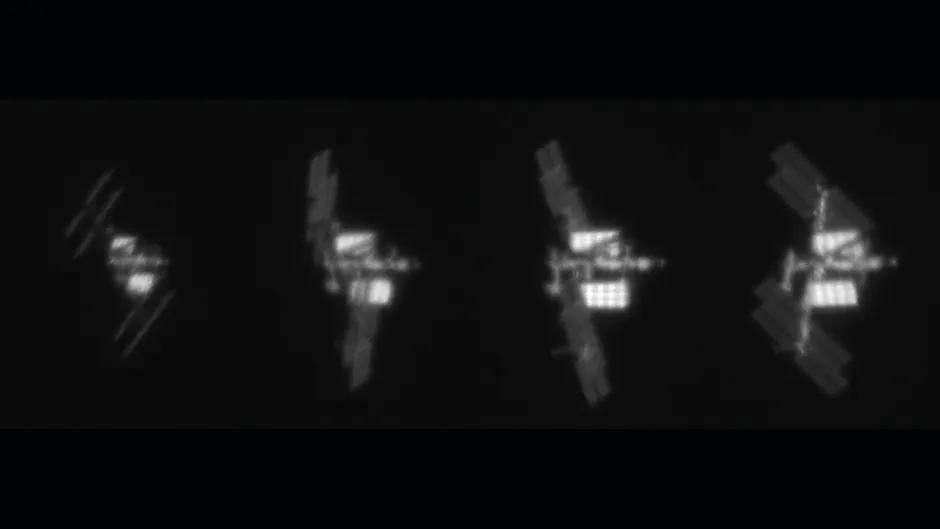
ISS visual impression in a small telescope
TTS-160 Panther tracking Starlink Satellite
These 3 simple steps are all that are needed for tracking the ISS with the Panther Mount
![]()
- Setup and align the mount as usual
- Start the APP Skytrack and connect to the mount using the ASCOM interface
- Select the ISS in Skytrack and click start tracking
Want to know more – here follows the procedure with more details added
Detailed procedure for setting up the system to track satellites
Preparing the mount
You will need a mount capable of tracking satellites.
Some mounts can track satellites using the simple Leapfrog technique. This means the mount performs a goto to a position ahead of the satellite and stops there. When looking in the eyepiece you will see the satellite cross the field of view at high speed, making it hard to observe any details.
Other mounts can track the satellites in real-time by allowing the motor speeds to be controlled smoothly to any commanded speed. There are different mounts available that can do this, but here we will focus on the Panther mount.
Installing the latest firmware
The latest firmware (release 355) for the Panther mount includes full satellite tracking capabilities. To access to the latest firmware contact Track The Stars via email (info@trackthestars.com). It is provided free of charge, as always
Preparing the ASCOM interface
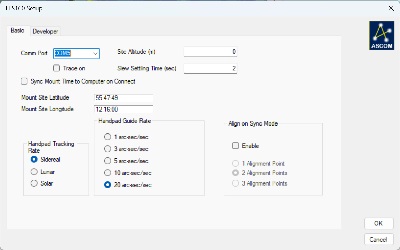
On the windows PC, you need to have the latest ASCOM platform 7 installed.
It can be downloaded here: ASCOM 7 RC4
In addition you will need the latest ASCOM driver for the Panther Mount.
It can be downloaded here: TTS160.v.355
Preparing SKYTRACK Satellite Tracking Software
SkyTrack is a windows application that can control ASCOM compatible telescope mounts to track satellites. It performs the following functions:
- downloads a list of all known satellites with the latest orbit data (TLE file)
- connects to the telescope mount through the ASCOM interface
- displays a list of satellites visible at the current time and geographical location
- control the mount to track any selected satellite
SkyTrack offers a 30-day free trial period, after which it costs $9.
Read more and download SkyTrack here: https://www.heavenscape.com/index.html
Basic setup in SkyTrack
Before starting to use SkyTrack some basic settings must be configured. There is a video from Heavenscape explaining how to do this, but here are the essential steps needed to start using the system:
The overall app windows looks like this:
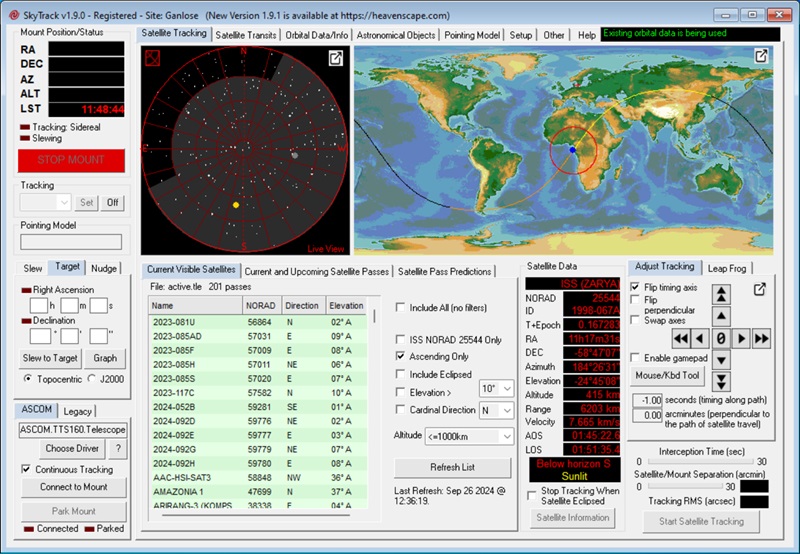
Mount interface in Skytrack
Open the ASCOM Telescope chooser by clicking Choose Driver.
In the popup window select the TTS-160 ASCOM Driver 355.
Click properties and select the relevant Com Port. Press OK.
Be sure to mark Continuous Tracking to get live smooth tracking.

Site data in SkyTrack
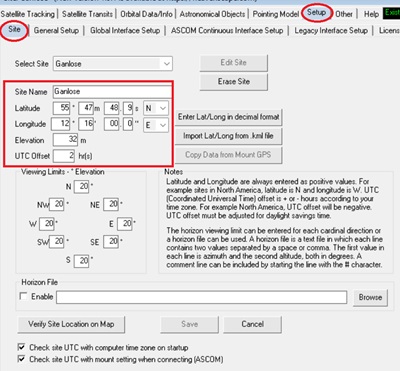
Goto to the Setup/Site tab
Input the data in the red square.
Latitude and longitude can be found on maps.google.com or in many phone apps.
UTC offset can be found on time.is
The rest of the settings can be left at the default values.
Orbital Data/Info in SkyTrack
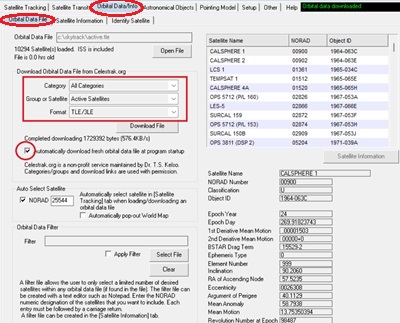
Goto the Setup/Orbital Data/Info tab.
On this tab, you select which satellites will be included in the observation lists. To have a good variety of satellites for testing during your first few uses, I suggest selecting All Categories and Active Satellites. The format should be left as TLE/3LE.
Now click download file to have the orbital elements of the selected satellites downloaded. Once downloaded, they will appear on the list on the right side of the screen.
It’s important to refresh this data daily, as it changes quickly. Be sure to select Automatically download fresh orbital data file at program startup.
Mount test run
Now everything is ready for a test run. It can by done indoors at any time.
Connect the USB-to-serial cable between the mount and the PC and power up the mount. The mount will perform its startup alignment and assume it is pointing south at an elevation of zero degrees.
Ensure that all cables can move freely when the mount moves.
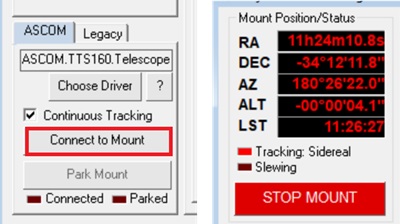
In SkyTrack, click Connect to Mount, and the mount position data will become live.
Now select Setup/ASCOM continuous Interface Setup.
Click Calibrate ASCOM Tracking and in the next screen click Run Calibration
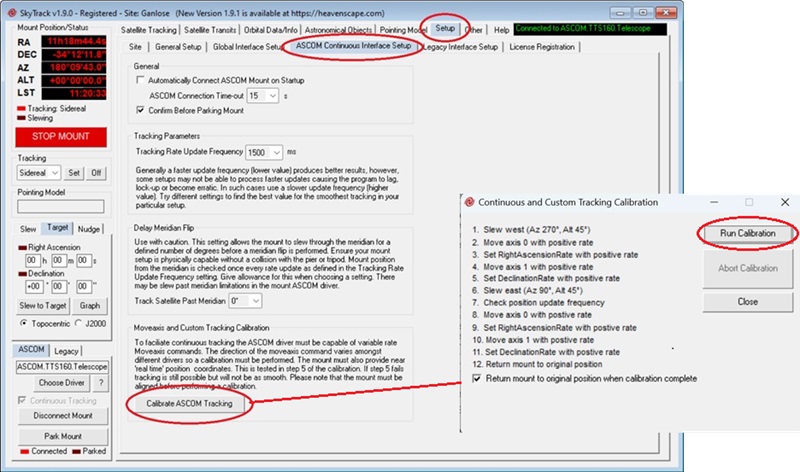
The mount will now be taken through a number of calibration steps where it slews to different positions.
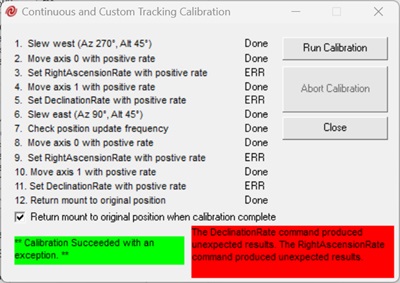 The results will be displayed.
It is normal and expected that test 3, 5, 9 and 11 fails. This will not influence tracking.
Now we are ready to track Satellites
With the necessary settings made in SkyTrack it is possible to start tracking satellites.
Align the mount as usual
First step is to setup and align the mount as usual.
Make a 2 star alignment. It is important to make a precise alignment with careful centring of the stars. After alignment is completed I suggest to make one or two test goto’s to see the alignment brings the objects in the field of view.
Now the mount is ready.
Start up Skytrack
When Skytrack has started the first thing is to connect to the mount.
Click Connect to Mount and the mount position data become live.
Select Satellite and start tracking
On the Current Visible Satellites tab, you’ll find a list of satellites. When you click on one of the satellites, the sky map and the Earth map will update to show the satellite’s orbit. The red circle indicates where the telescope is pointing. Try selecting different satellites until you find one with a pass that matches your best viewing direction.
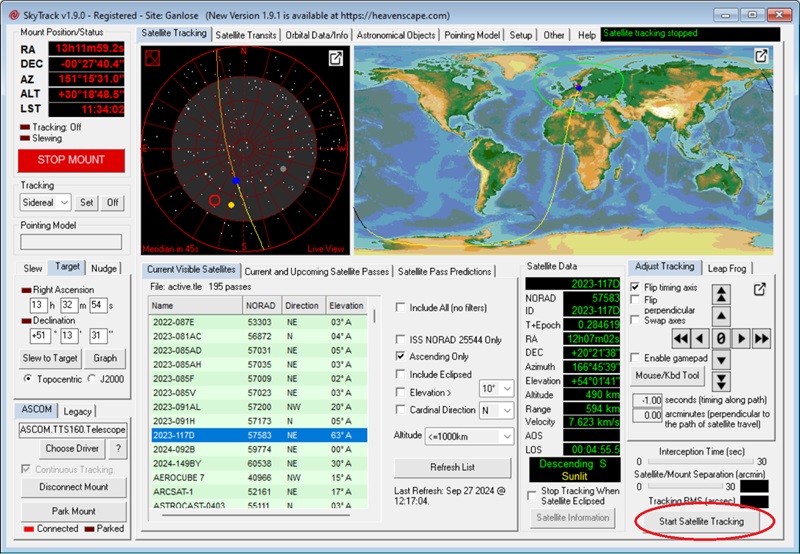
Click Start Satellite Tracking
The mount will move toward the satellite’s position at maximum speed. Once the satellite’s position is reached, the mount will begin tracking it.
Use a low-power, wide-field eyepiece when first locating a satellite.
Centering the satellite.
![]()
Often the satellite will not be right in the centre of the FOV. This is mainly due to the accuracy of the orbital data and the time setting of the PC. To address this issue, SkyTrack provides an interface for centering the satellite.
There are a single and a double arrow for each movement direction (along the movement path and perpendicular to the movement path). When clicking one of these arrows the tracking position is offset in that direction. One arrow gives a small offset. Double arrows gives a larger offset (offset value can be adjusted under settings).
In most cases, the satellite will be off in the timing direction (ahead of or behind the expected position). If the satellite is not visible at all, it’s best to search using the double timing arrows.
Since it’s challenging to look through the eyepiece and click on the PC screen at the same time, you can connect a gamepad to SkyTrack for easier control.
Final words on ISS tracking
When observing a ISS pass, it is a good idea to be ready well before with a perfect aligned mount. If you click Start satellite Tracking in SkyTrack before ISS has risen, the telescope will slew to the position where it will emerge and wait there. As soon as the mount begins tracking, it’s best to center the ISS, as its movement is very slow at this stage, making it easier to do so.
BBC Sky at Night Article on how to take a photo of the International Space Station