Camera rotators are today primarily used to frame the target when taking Astrophotos. With the newest high-resolution camera rotators, it is now possible to take perfectly tracked Astrophotos with an Alt-Az type telescope mount. Why bother doing that? Well, it means faster setup with no polar alignment and undisturbed imaging from east to west, with no meridian flip to worry about.
Read on and learn how it’s done…
Let’s start with a fast summary of how it works:
Step-by-step procedure for an imaging session with an Alt-Az mount with a camera rotator
- Set up the mount and telescope. No levelling of the tripod is needed.
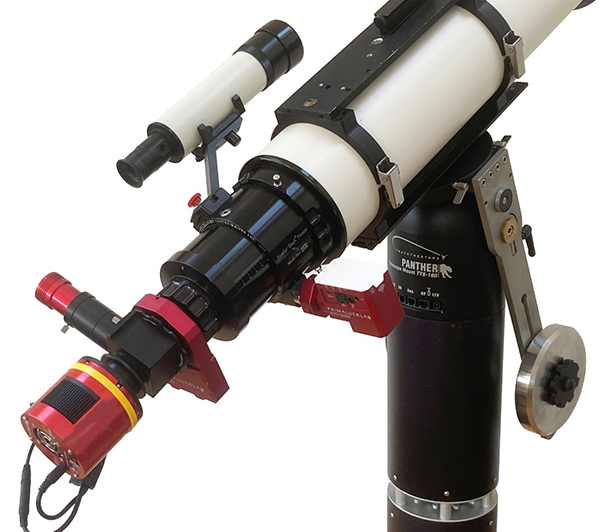
- Install and connect the imaging gear as usual: Main camera, filter wheel, off-axis guider, guide camera, camera rotator, and motor focuser.
- Power up everything, including the PC and the needed software apps.
- Move indoors if desired and continue from a remote desktop. No need to be outside for Polar Alignment when it gets dark.
- Perform a 2-star alignment using plate solve.
- Slew to the target. The camera rotator will allow for precise framing as planned.
- Start camera rotator tracking.
- Perform the steps to take the sub-exposures. Either manually or via a predefined sequence:
- Run autofocus.
- Calibrate and start the autoguider.
- Take the subs.
- Continue all night – no Meridian flip to worry about – as part of a predefined sequence or move on to another target.
Want to know more – here follows the procedure with more details added
Step-by-step procedure for an imaging session with an Alt-Az mount with a camera rotator
With details included
- Set up the mount and the telescope. No levelling of the tripod is needed.
- Many Alt-Az mounts don’t require a levelled tripod, making setup easier and faster
- Install and connect the imaging gear as usual: Mount, Main camera, filter wheel, off-axis guider, guide camera, camera rotator, and motor focuser.
- If you are accustomed to long-exposure astrophotography, you are likely familiar with the necessary gear and its connections. Perhaps you even have everything installed and assembled on the OTA for quick setup without any cable hazards.
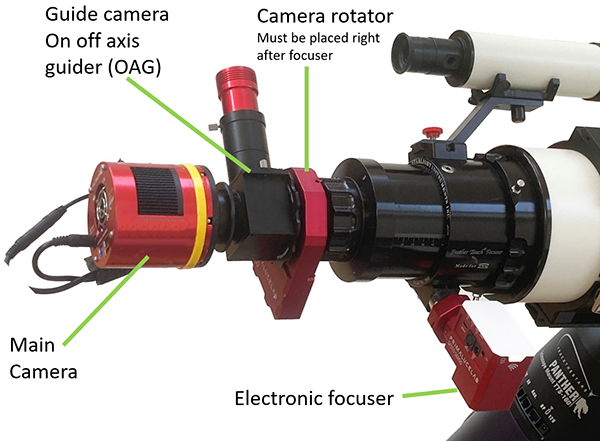
There are two crucial things to be aware of:- The camera rotator must possess a high step resolution to de-rotate smoothly and allow for precise guiding. See the section below regarding the selection of a useable camera rotator.
- Autoguiding must be done with an Off-axis guider (OAG). This is because the guide camera must rotate in tandem with the main imaging camera. It means the imaging train on the telescope must resemble this configuration:

- Power up everything, including the PC and the necessary software apps.
- Using a PC is recommended to allow for the use of any brand of hardware and software.
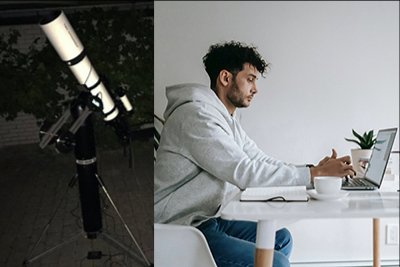
- You can now move indoors if desired and continue from a remote desktop. There is no need to be outside to Polar Align when it gets dark and cold.
- As there are no physical adjustments to be made on the mount, everything can be controlled remotely. It means you can set up any time (even during daylight) and just start it remotely from wherever you are.

- As there are no physical adjustments to be made on the mount, everything can be controlled remotely. It means you can set up any time (even during daylight) and just start it remotely from wherever you are.
- Perform a 2-star alignment using plate solve.
- Point the telescope in any direction not too high in the sky. Take a short exposure, plate solve the image and use the coordinates to align star 1. Go to another part of the sky, some 60-90 degrees away, and repeat the process to align star 2. Read more about this process here or watch this video.
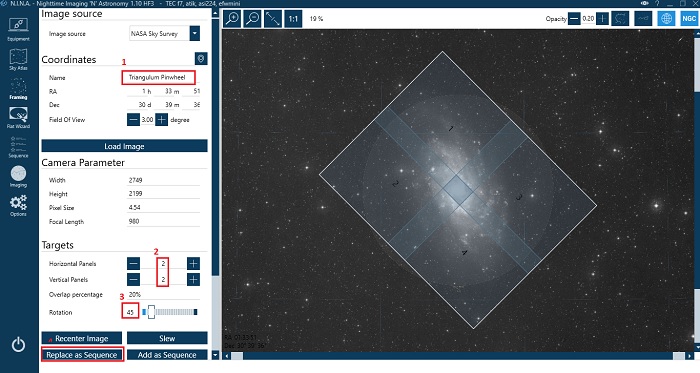
- Slew to the target. With the camera rotator, precise FOV framing in both angle and position is possible.
- Object RA and DEC coordinates, along with the camera rotation angle, can be found in the control software. As an example, the Framing assistant in NINA looks like this:

Simply drag and rotate the image FOV to the desired position, and the goto and plate solve routine will do the rest. The very user-friendly PLAY software from Primalucelab can also make the slew to target, including rotation of FOV.- Start camera rotator tracking
- The tracking of the camera rotator is managed by the software provided by the manufacturer. In this case, I have used an Arco Rotator from Primalucelab.

- The tracking of the camera rotator is managed by the software provided by the manufacturer. In this case, I have used an Arco Rotator from Primalucelab.
- Perform steps to take the sub-exposures, either manually or via a predefined sequence:
- Run autofocus.
It is possible to focus manually or by using autofocus, both manageable remotely. - Calibrate and start the auto guider
I have used PHD2 for guiding. The procedure is the same as when guiding a Polar-aligned mount, except that the guide camera angles change as the camera rotator rotates. Therefore, the camera rotator must be connected to PHD2 to manage this, or the guider must be recalibrated at regular intervals. In my case, I’ve set up my NINA sequencer to do this hourly along with autofocusing, which has been working perfectly.
Read the article on Guiding the Panther Alt-Az mount with PHD2 to learn more about guiding Alt-Az mounts. - Take the subs.
- Run autofocus.
- Continue all night – no Meridian flip to worry about – as part of a predefined sequence, or move on to another target.
- Start camera rotator tracking
- Object RA and DEC coordinates, along with the camera rotation angle, can be found in the control software. As an example, the Framing assistant in NINA looks like this:
- If you are accustomed to long-exposure astrophotography, you are likely familiar with the necessary gear and its connections. Perhaps you even have everything installed and assembled on the OTA for quick setup without any cable hazards.

Some results:
I have used the system successfully for a few nights. I have used two different telescopes with the Arco Rotator from Primalucelab on the Panther Mount.
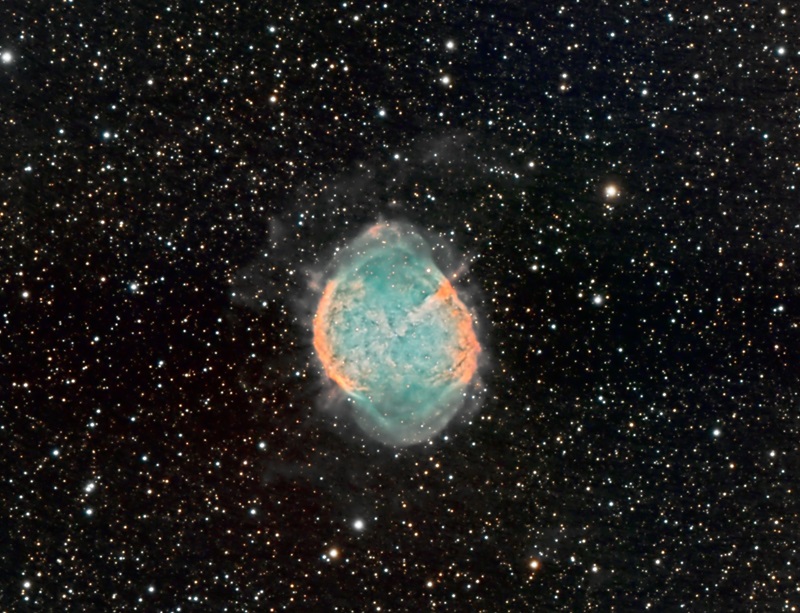
The first image is M27 imaged in One-shot-colour and HA.
- TEC 140mm f/7 refractor
- TTS-160 Panther telescope mount
- 40×180 sec colour data taken with ASI 071 MC Pro camera
- 100×180 sec HA data taken with Atik Horicon camera
- De-rotated with Primalucelab Arco 2″ camera rotator
- Guided with ASI 120mm mini guide camera on OAG.
- Software used: PLAY, PHD2, NINA
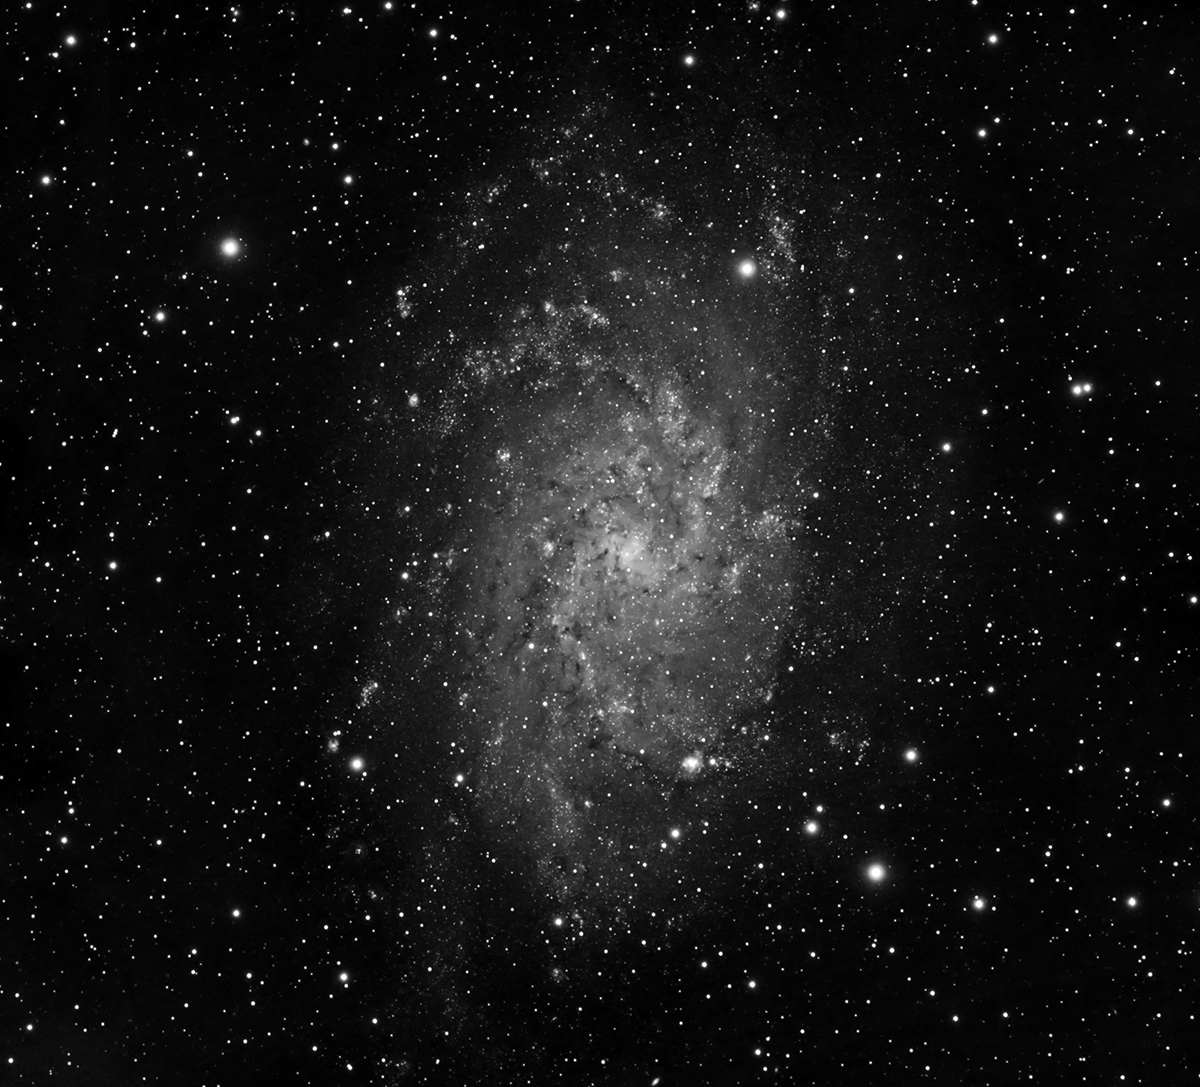
I also tried M33 with a longer combined exposure time. It took over two nights. The individual subs were 120sec, not to saturate the galaxy centre. All the images are taken in Luminance. Unfortunately, we are in a rainy period of the yea,r so there has been no chance to add colour data yet.
- Askar FRA600 Astrograph (fl 600mm f/5.9)
- TTS-160 Panther telescope mount
- 379×120 sec LUM data taken with Atik Horicon camera – 12.5 hours total exposure time
- De-rotated with Primalucelab Arco 2″ camera rotator
- Guided with ASI 120mm mini guide camera on OAG.
- Software used: PLAY, PHD2, NINA
Demands for camera rotators for long exposure Astrophotography – ALT-AZ field de-rotation
Today, camera rotators are primarily used to frame targets when imaging with a polar-aligned setup. The demands for that operation are:
- It must keep focus accurately when it rotates. It must not change the sensor position or tilt the sensor.
- It must be able to rotate to a commanded angle and stay there. The angle resolution and the step size of the movement are not critical.
When the camera rotator is being used for alt-az field de-rotation, there are some extra demands:
- The rotator must be able to track smoothly with very small step sizes.
- The rotator must come with software that can control the de-rotation.
Let’s look at the extra demands for de-rotation use
How precise must the de-rotation be?
You might think adding the rotator will create new critical demands for the drive involved. But actually, the demands for the precision of the de-rotator are much smaller than expected!
When you guide your telescope mount there is a certain needed accuracy. This accuracy depends on the focal length, the camera pixel size and the seeing. In this example, we will focus only on the focal length.
If you imagi with a focal length of 1000 mm and the mount is guided with an accuracy of 0.4 arc-second, the error seen on the sensor at the focal plane will be:
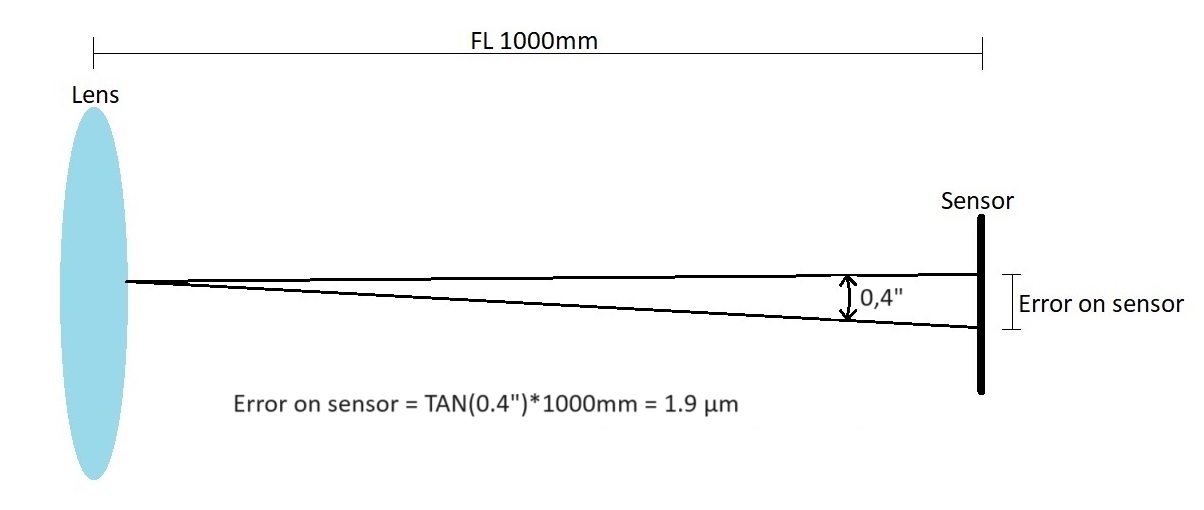
So with a tracking accuracy of the mount head of 0.4 arc-second, the error on the sensor will be 1.9 µm.
When it comes to rotating the camera, the focal length has no influence. It is only the size of the sensor and the placement of the pick-up mirror for the Off-Axis Guider that matters:
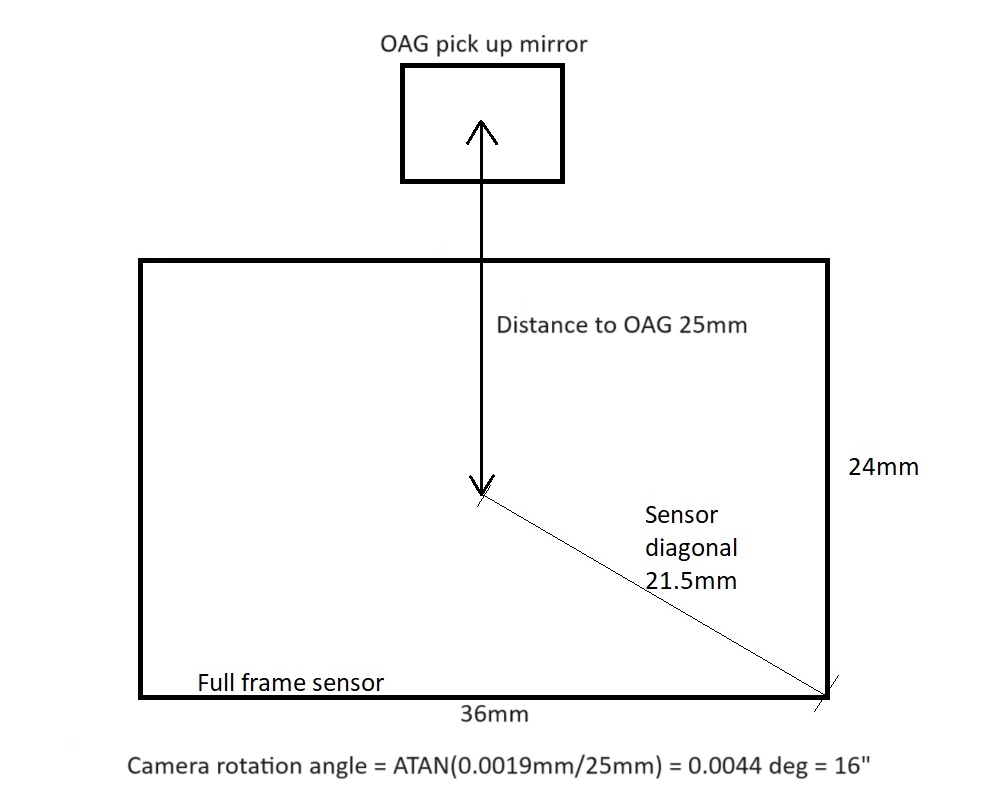
This calculation shows that even with a full frame sensor the rotator must rotate 16 arc-seconds to move a star 1.9 µm at the OAG pick up mirror.
So the accuracy needed of the camera/telescope rotator is a factor of 40 less than what is needed of the main mount drives. Not so much to worry about!
Demands for the step size/resolution of the camera rotator
To get high-quality results, the camera rotator must have:
-
Step size smaller than 16″ equals more than 81.000 steps per revolution.
Note that these numbers are the same for any focal-length telescope.
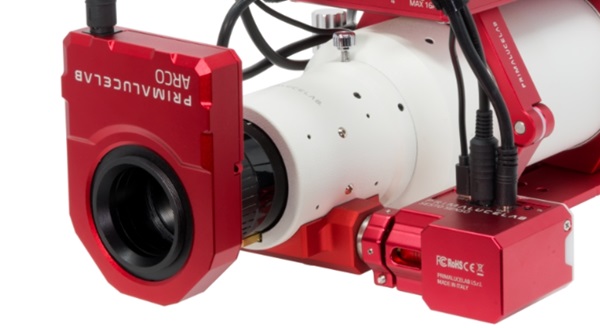
The camera rotator was used in my setup.
I decided to use the Arco rotator from Primalucelab as it has a step size of only 1 arc second, making the movement very smooth. Together with the Sesto Senso focus motor, the system has worked extremely well. The PLAY control software manages the field de-rotation perfectly.
If you have any comments or questions, feel free to send me an email at nth@trackthestars.com