Alt-Az mount Astrophotography – easier than ever
It’s getting easier and easier to use Alt-Az mounts for Astrophotography (AP). You don’t have to bother with levelling and polar alignment, so you can setup very fast and easy. With the many new computer devices it is also possible to control the system remotely. Most Alt-Az mounts can be used for short exposure AP as they are. When you want to take longer exposures you need a field de-rotator.
In this article I will explain how you can use the ASIAIR Pro computer unit to automate the imaging process. Most things are general for any mount type but I will focus on the things that needs special attention when using an Alt-Az mount.
This PART 2 article will focus on how you take the first images.
Click here if you have not read PART1 How to set up the system
I hope you find the article interesting. If you have any comments or improvement send me an email at nth@trackthestars.com.
Under the sky
Aligning the mount
Most alt/az mounts are aligned using one or two alignment stars. The normal procedure is to point to a known star and center it precisely in an eyepiece. In this case we will use the camera and the AAP to make the alignment.
- Via the mount hand-pad select align star 1 and slew to the star.

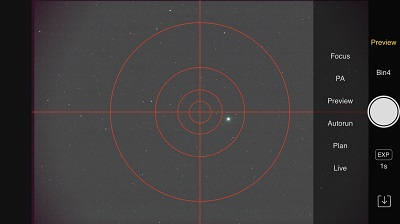
- On AAP open the preview screen and setup a 1sec exposure. Set the Binning to the largest possible value to get a fast updating of the images.
- Now take exposures continuedly and center the star. Use the tool – Crosshair, to center precisely. Focus if needed to see the star but there is no need to focus precisely yet.
- When the star is centered push “align” on the mount hand-pad.
- Repeat for align star 2
Focusing the cameras
Before we can start the imaging run both camera must be focused.
- Point the telescope at a fairly bright star like mag. 1
- Select the Focus mode and set exposure to 0,5 sec
- Now focus manually watching the star and the numbers on the screen
- To make the focus more precise finish off using a Bahtinov mask or use the “Auto Focus” procedure on the AAP if you have an electric focuser.
Focusing of the guide camera can be done the same way.
Centering objects using AAP Goto and plate solve
The AAP can control the mount through the Ascom interface (see PART 1 of the article on how to set up this). If you select an object in the internal catalog and click goto the mount will slew to the target. If you have enabled “Autocenter” AAP will take a short exposure, plate solve the image, sync the mount and re-center. All this happens within few seconds most times. With long focal length and small image sensors plate solve can be tricky, but usually it works very well.
- Select object from the Object catalog and click goto
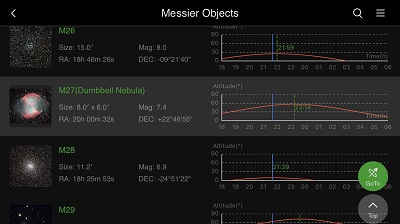
- The mount automatically centers the target
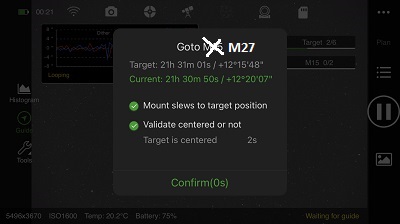
Sorry guys – lost correct screenshot so for now this must do…
Calibrate and start the guider
With the target framed correctly it is time to start the guider.
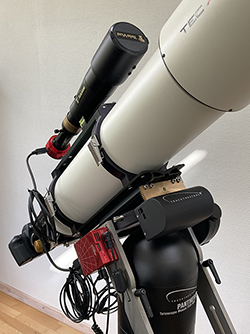
If you are using the Panther Mount with Telescope rOTAtor it must be reset and switched on now.
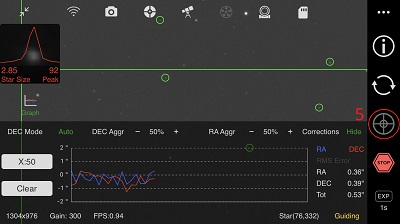
- Open the guide screen by clicking the guide Icon


- IMPORTANT for Alt-Az mounts. DEC mode must be set to Auto
- Set the exposure time around 1-2 sec
- Click the “double arrow circle” icon to start taking guide pictures.
IMPORTANT FOR ALT-AZ MOUNT GUIDING:
You must select one single star as guide star. Don’t let the APP select multiple stars for guiding. The field rotation will rotate the selected pattern of stars making guiding impossible.
If you use the Panther Mount with Telescope rOTAtor there is no visible field rotation and the guider can work on multiple stars. The illustrations below is made this way with multiple stars.

- Click Guide icon. AAP will select a number of stars (marked with green circles) and start calibration (remember to pick just one if you use a normal Alt/Az mount)
- If the APP starts to guide immediately it re-uses old calibration data and that is (most times) not good.
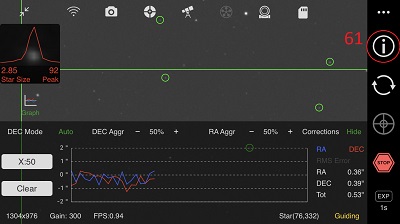
- To force calibration you must clear the previous calibration data. Click the I – icon.
- To force calibration you must clear the previous calibration data. Click the I – icon.
-
- The Info-screen shows you how the calibration looks. Press CLEAR to force a new calibration.
- The Info-screen shows you how the calibration looks. Press CLEAR to force a new calibration.
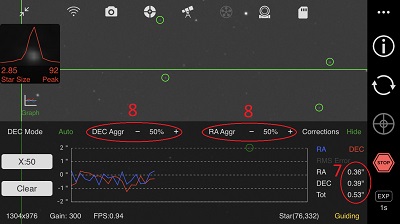
- After the calibration the AAP will begin to guide the mount. After some seconds to settle, you can see the RMS of the guide accuracy.
- Adjust aggressiveness as needed to obtain the best guiding – exactly as on any other mount. Generally you can use the same values every time but the seeing can have influence on this.
Using “AUTORUN MODE” to take a number of subs
The telescope is now tracking the object precisely and the real imaging can begin. It is possible to use either “LIVE MODE” where the images are stacked and displayed on the fly or “AUTORUN MODE” where it is possible to set up a sequence of exposures to be taken and saved for later processing. Setting up the Autorun Mode is very straight forward and is independent on the mount type. For a DSLR the setup is like this:
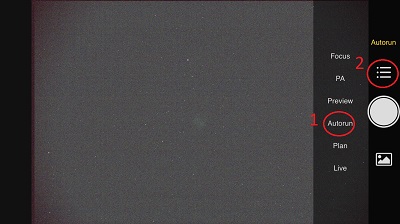
- Select the AUTORUN mode
- Select the “List” icon to open the AUTORUN settings.
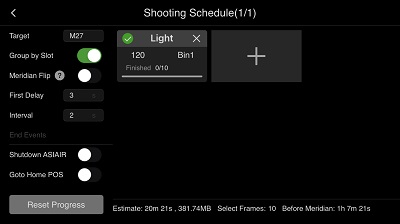
- Now the Schedule screen is displayed. Pay attention to the following settings:
- The target name is shown based on the latest Goto object. The taget name is included in the filename of the subs.
- Group by slot is related to Monochrome imaging so I won’t go into details about that.
- Meridian Flip: This must be OFF for an alt-az mount.
- Delay and interval can be set as you wish. If needed increase a bit to allow the guider to settle.
- If you Turn ON “Shutdown ASIAIR” the APP will shutdown after completing the Scheduled subs. I had the mount powered from the APP so this conveniently switched everything off.
- If you Turn ON “Goto Home POS” the APP will command the mount to PARK before shutting off.
- Click the Box saying “Light” or the + to edit/add the exposure sequence.
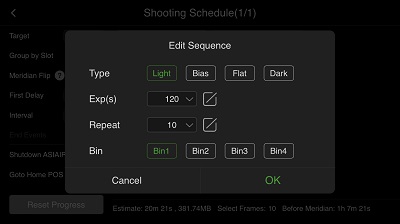
- Now the image sequence screen is shown. You can add more of these as needed and they will be executed after each other.
- Select the type of Subs. Here “Light” is selected.
- Set the exposure time
- Set the number of subs wanted
- Select the Binning of the camera.
- That’s is. Close the window and press back to come to the main screen.
- On the Main screen push “SHOOT” and the scheduled sequences will be executed. Be sure to have started the guider before.
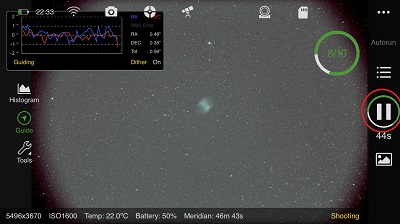
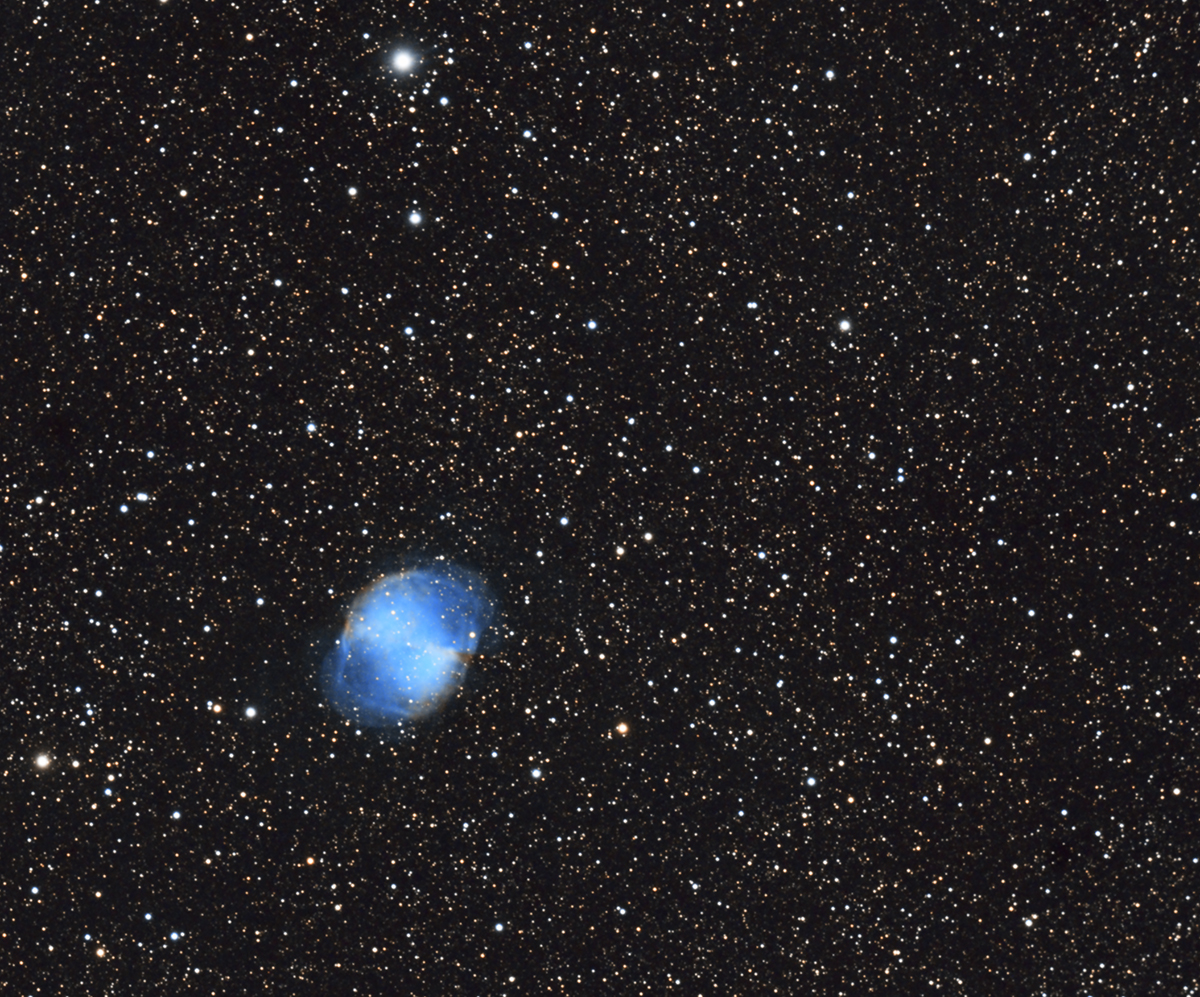
That’s it. The system is now catching photons thousand of years old and can do that all night long.
I made the test and the screenshots for this article on a full Moon night in August 2021. Not at all good conditions for a DSLR camera without any filters. Never the less here is the resulting image.