Alt-Az mount Astrophotography – easier than ever
It’s getting easier and easier to use Alt-Az mounts for Astrophotography (AP). You don’t have to bother with levelling and polar alignment, so you can setup very fast and easily. With the many new computer devices it is also possible to control the system remotely. Most Alt-Az mounts can be used for short exposure AP as they are. When you want to take longer exposures you need a field de-rotator.
In this article I will explain how you can use the ASIAIR Pro computer unit to automate the imaging process. Most things are general for any mount type but I will focus on the things that needs special attention when using an Alt-Az mount.
This PART 3 article will focus on how you use the PLAN MODE for unattended imaging.
Click here if you have not read PART1 How to set up the system
Click here if you have not read PART2 How you take the first images
I hope you find the article interesting. If you have any comments or improvement send me an email at nth@trackthestars.com.
Planning an automated imaging session
To have success with unattended imaging good planning is important. Below is a number of things to consider related to the mount and tracking. In this article I do not look into cameras, filters, Field of view and other aspects that are just as important when you pick your targets.
The considerations related to Alt-Az mounts are:

- Where in the sky is the target placed:
- Plan to image when the object is highest in the sky around the meridian. There is no meridian flip to worry about.
- Avoid targets above altitude 85 degrees. That’s about the maximum altitude where an Alt-Az mount can track well. If the target gets closer to zenith than this shoot another target until the “dead zone” has been crossed.
- If you image without a field de-rotator it can be an advantage to image in East and West where the field rotation is slowest and allow for the longest subs.
- Find a suitable exposure time for the individual subs
- For a basic Alt-Az mount the field rotation sets the limit for the exposure time. Typically around 30 secs can be used for many targets. In East and West 2-3 minutes is possible. Have a look at this article to learn more about exposure time for the individual subs.
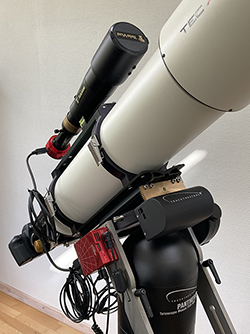
- If you use the Panther Mount with the Telescope rOTAtor you can select the sub exposure time as long as you wish.
Making the plan – before adding it to ASIAir Pro
Here is an example on how I will prepare for tonight’s imaging session. We are in October and I am at latitude +56°. I plan to start imaging at around 20.00 local time . That will give me time to setup and prepare things.
I use different planning tools but Telescopius is a good place to start.
I have selected three objects:
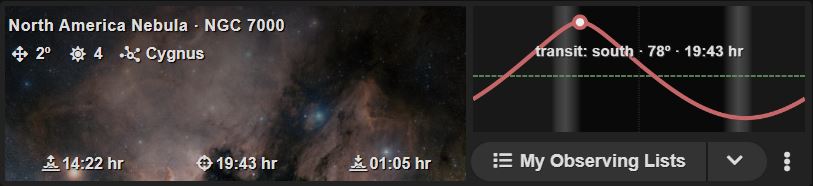
- NGC7000 North America Nebula: Start 20:00 (Az: 190, alt: 78°), End 22:00 (Az:255°, alt: 66°) (max alt: 78°)
- Based on the sky position the longest recommend subs will be around 20 secs without a field de-rotator (see table in this article)
- With a field de-rotator the subs exposure time can be as long as wished
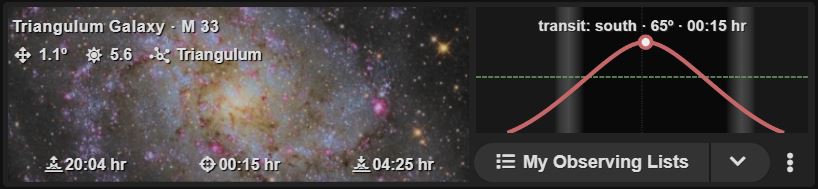
- M33 Triangulum Galaxy : Start 22:00 (Az: 118°, alt: 54°), End 01:00 (Az: 196° alt: 64°) (max altitude 65°)
- Based on the sky position the longest recommend subs will be around 30 secs without a field de-rotator
- With a field de-rotator the subs exposure time can be as long as wished
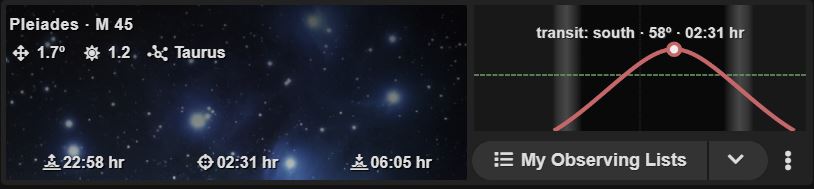
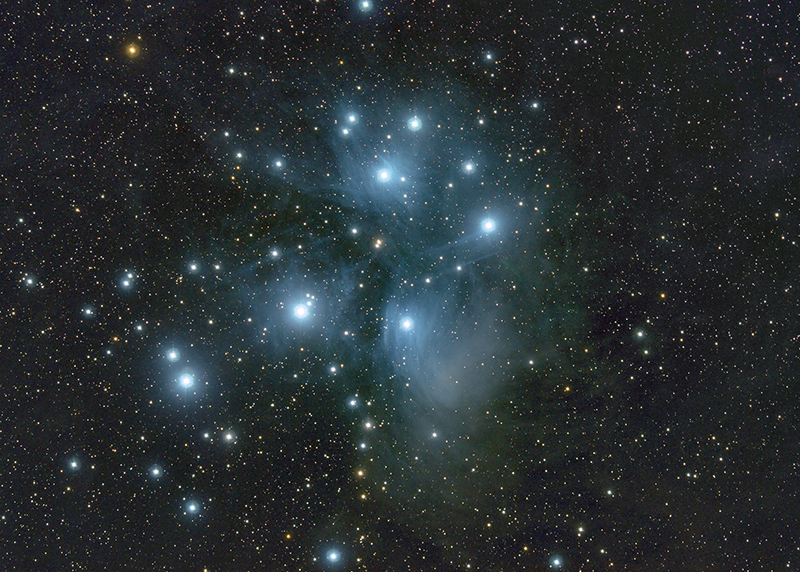
- M45 Pleiades: Start 01:00 (Az: 140°, alt: 54°), End 04:00 (Az: 213°, alt: 55°) (max altitude 58°)
- Based on the sky position the longest recommend subs will be around 30 secs without a field de-rotator
- With a field de-rotator the subs exposure time can be as long as wished
Setting up the PLAN on the ASIAir Pro – BASIC Alt-Az mount without de-rotator
>>>>(Click here if you want to see how to set up the PLAN using a Telescope rOTAtor)<<<<
Now the plan can be typed into the AAP. You can do this indoor but must connect camera and filter wheel to the AAP.
- Select PLAN MODE and open the settings

- Open the list of PLANs to add a new plan

- Select Add to create a new plan

- Fill in the fields
- Name your plan
- Switch on Start Guiding if you have an autoguider connected (recommended).
- Switch off Auto Meridian Flip. Never used on an Alt-Az mount
- Set the starting time. This can be a certain time or it can be set to be started manually.
- Set plan to end when it is completed.
- Set the End Options as wished.
- By shutting down the AAP you can also switch off equipment being powered through the AAP. I use this to switch off mount, dew heaters and the cameras being powered that way too.

- Now start setting up the first target. Press +
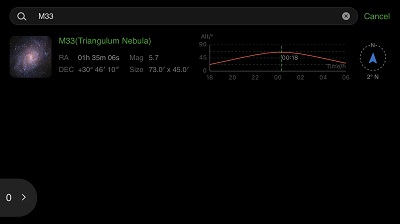
- Select object
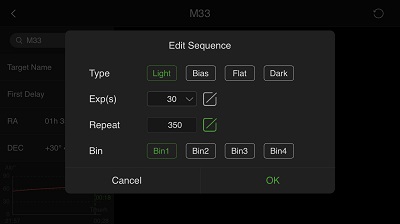
- Input exposure data.
- 30 secs is maximum without de-rotator.
- 350 subs adds up to around 3 hours as planned.
- Repeat the procedure for the other objects until the plan is completed.
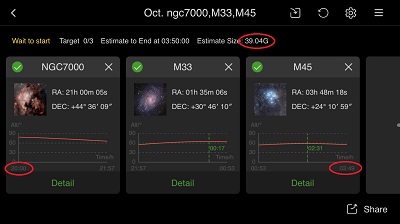
- Notice that estimated start and end times are shown. But be aware these times can be quite wrong depending on the download time of the camera. This is especially the case when many short exposures are taken.
- Notice the needed storage capacity. With many subs this number is big.
This completes the setting up of the PLAN. Be sure that you have set up other basic settings. See PART1 of this article
Setting up the PLAN on the ASIAir Pro – Using Telescope rOTAtor for long subs
If you wish to take longer subs with an Alt-Az mount a field de-rotator is needed. Here I will explain how you can use the PLAN mode on ASIAir Pro together with Track The Stars telescope rOTAtor.
The telescope rOTAtor can rotate totally about 26 degrees. When it reaches it’s end of travel it must be rewound. It can be rewound manually from the handpad or automatically when the mount receives a goto command over ASCOM. The automatic rewind always rewind to the centre position giving 13 degrees for the de-rotation. In this case we will use the goto command coming from the AAP for the automatic rewind.
To be sure the rewinding will take place before reaching the end of travel we will aim for rewinding every 30 minutes.
Here is the procedure to set up an object – M33 – on the ASIAir Pro PLAN
The first 4 steps of setting up the plan is the same as for the Basic Alt-Az mount.
- Select PLAN MODE and open the settings
- Open the list of PLANs to add a new plan
- Select Add to create a new plan
- Fill in the fields and press OK
When adding the target, things are slightly different
- Now start setting up the first target. Press +
- Select Object
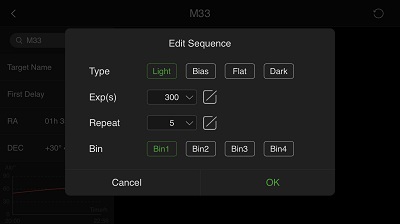
- Input Exposure data
- We must aim for a total exposure time (including download time) of 30 minute. In this case we will take 5 subs of 300 secs.
- We must aim for a total exposure time (including download time) of 30 minute. In this case we will take 5 subs of 300 secs.
We have now created an exposure plan for target M33 of approximately 30 minutes duration. What we do now is that we copy this Target 6 times. It means the AAP will command the mount to go-to the object and take the 5x300sec subs 6 times. And that adds up to 30×300 sec or 2.5 hours. Unfortunately the only way to copy the task is to input it again – by repeating step 5-7. But it only takes a couple of minutes to do.
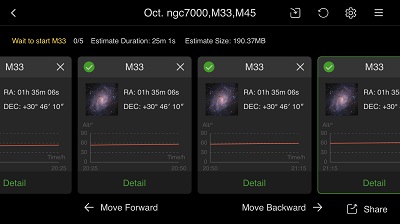
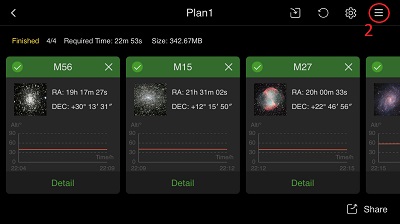
The plan ends up like this:
Do the same for the other targets.
This completes the setting up of the PLAN. Be sure that you have set up other basic settings. See PART1 of this article
Under the sky
After setting up the mount and telescope you must align the mount, focus the telescopes and calibrate the guider. This is described in PART2 of this article.
When all this has been completed, you can start executing the created PLAN.
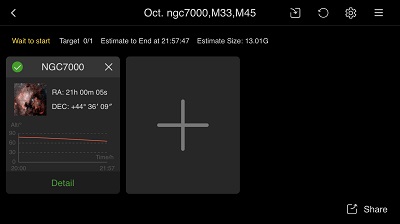
When you click “PLAY”, this start screen is shown: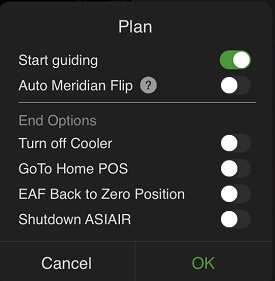
It shows the same settings as you made when creating the plan. Be sure to have Guiding on and Auto Meridian Flip off
Press OK and the plan will be executed!
Troubleshooting ASIAir PLAN mode
Using the ASIAir Pro gave me some learning points. I had some sessions ending with bad subs, and most times I found a root cause. If you experience subs with very elongated stars, you should check:
- Cable routing – are all cables to all equipment routed in a way that secures free movement wherever the telescope is pointing?
- Interference – is there any risk that the telescope/camera can hit the mount head/Pier? At high altitudes this can be a problem.
- Clouds/Dew – disturbing guiding. If the guide star is lost, the mount can track away, giving very elongated stars and bad framing. Check the subs to see if the signal is decreasing before the problem occurs, and check the log files created by the AAP
For a first time use of the PLAN mode I suggest that you make a plan with 3-4 objects and just take 2 exposures on each lasting some seconds. It will give you a chance to see the complete plan be executed within a short time and to watch each step carefully.
Good luck and clear skies.
Read PART 1 of this article
Read PART 2 of this article