Alt-Az mount Astrophotography – easier than ever
It’s getting easier and easier to use Alt-Az mounts for Astrophotography (AP). You don’t have to bother with levelling and polar alignment, so you can setup very fast and easy. With the many new computer devices it is also possible to control the system remotely. Most Alt-Az mounts can be used for short exposure AP as they are. When you want to take longer exposures you need a field de-rotator.
In this article I will explain how you can use the ASIAIR Pro computer unit to automate the imaging process. Most things are general for any mount type but I will focus on the things that needs special attention when using an Alt-Az mount.
This PART 1 article will focus on making the cabling and setting up in the app. All this can be done indoor.
I hope you find the article interesting. If you have any comments or suggestions send me an email at nth@trackthestars.com.
Small dedicated computers to control your imaging session
If you are into more serious Astrophotography the amount of equipment needed can be quite overwhelming. A complete advanced AP setup could contain:
- Mount, pier
- Main telescope
- Main imaging camera
- Filter wheel
- Electric focuser
- Rotator
- Guide telescope
- Guide camera
- USB hub
- Dew bands

All this equipment need to be computer controlled to work together and often you would like to setup a sequence of actions, that can “run the show” while you get a rest or enjoy visual observations.
The usual way to do this is to use a laptop computer with several available USB ports. In many cases this is a very good way to handle the task, but bringing a laptop outside and handling all the cables can be troublesome. Therefore we have seen a number of special “astro computers” come to market. They can be mounted on the telescope, helping organising all the cables and allowing for remote wi-fi control. One example is the ASIAIR pro but others like Stellar Mate or Astroberry does the same. Dedicated Astro PC solutions are also available on the market. So there are many possibilities for Astrophotographers.
I decided to test the ASIAIR Pro on the TTS-160 Panther Alt-Az mount. In this post I will describe how to set it up and report the most important learnings. Even though I have used the Panther mount, most of the principles will be the same on other Alt-Az mounts. But the achievable results depends very much on the mechanical quality of the mount.
What is the ASIAIR Pro
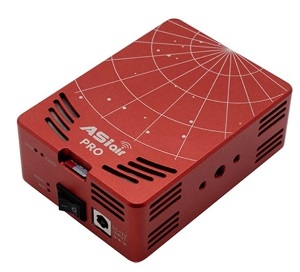
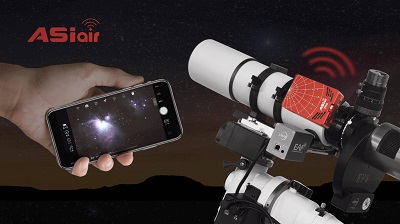
The ASIAIR Pro (made by ZWO Optical) is a small computer unit based on a Raspberry PI. It has 4 USB connectors (2 USB3 and 2 USB2) for connecting equipment. Besides this is has a power hub with four 12V outlets that are software controlled. The unit is controlled from an app running on either a mobile phone or a tablet. When powered up the unit creates it’s own wi-fi network that you connect your device to and then control it from the app.
The idea is that you fix the unit to the telescope/mount so that it rotates together with all the other parts of the setup. All the USB cables can be fixed to the mount/telescope for a good and safe operation. The only cable going onto the rig is the 12V power cable. Everything else moves with the mount and telescope.
The ASIAIR Pro can control ZWO cameras and DSLR cameras. Other camera brands can not be used. For that other solutions like Stellar Mate or PC based solutions must be found.
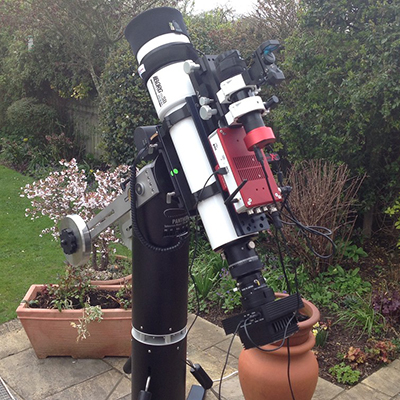
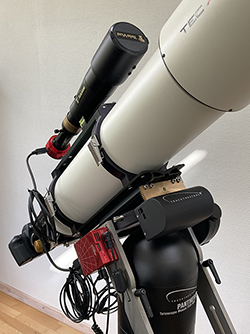
The setup I used
- TTS-160 Panther Mount with telescope rOTAtor
- TEC-140 APO telescope
- Canon 6D DSLR camera
- ZWO EAF electronic focuser
- TV 60 (fl 360mm) guide scope
- ZWO ASI224 MC guide camera
- ZWO ASIAIR Pro control computer

Connecting all the equipment:
The ASIAIR Pro (AAP) was mounted on one of the counterweight arm. This is a convenient position as it moves together with all the equipment that connects to it. Keeping the cables free of movement and pull is important to avoid connection issues. Some of the cables I have are it bit long so I needed to curl them up. New shorter cables would be good. Placing the AAP on the main OTA is also a good position.
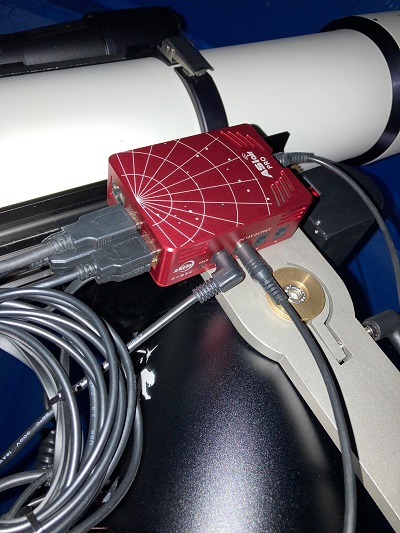
Power connection
One cable goes from the 12V 3A power supply to the AAP. This is the only cable going onto the moving rig. Then the AAP power hub is used for distributing the power. One cable goes to the mount and one cable goes to the electronic focuser. The Canon cable runs on battery (for now) and the guide camera is powered over USB.
For users of the Panther mount: Power for the mount head and the rOTAtor must come from one 12V outlet on the AAP using the split cable.
USB connections
The AAP has two USB3 and two USB2 connections. Actually none of the devices to be connected needs USB3 so they could be plugged in more ore less randomly. I decided for:
Mount and electronic focuser on USB2
Canon 6D and ASI224MC on USB3
Setting up in the ASIAIR app (first run only)
The first run setup I suggest doing indoor to learn everything nice and quietly. All the settings are stored on the unit so you just need to do this one time.
When all connections are checked the AAP can be powered up. After a few seconds it bips and is ready for use.
Open the ASIAIR app (available for IPhone and Android) and make the following setup:
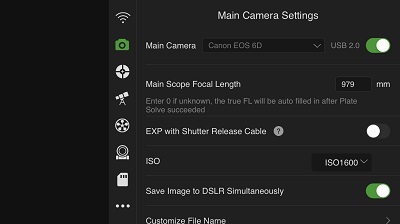
Main camera settings
- Select the main imaging camera from the drop down list. The camera is only visible if connected and powered up.
- Input main telescope Focal Length. This value will be updated after the first plate solve to get it more precise.
- The other settings are camera dependent and not important here.

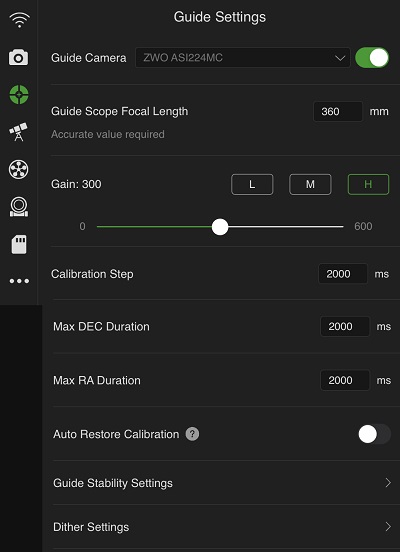
Guide Settings (one special settings for alt/az mounts)
- Select the guide camera from the drop down list.

- Input guide telescope Focal Length.
- Input camera gain. This setting depends on you guide camera and guide telescope but Medium is a good starting point.
- Calibration step. This setting depends on your mount. For the Panther Mount 2000ms is fine and a good starting point for most mounts. If to few (lest than 5) calibration points are available decrease this number. If the calibration takes long time (several minutes) increase this number.
The guide speed can also be setup on many mounts. On the Panther mount 5″/sec is a good setting. - Max DEC, Max RA duration. On an alt/az mount altitude works as DEC and Azimuth as RA. 2000ms is a good value here. Play with it if needed.
- Auto restore calibration. It is important to switch this OFF when you use an alt/az mount. It means a calibration will be made every time a new target is selected. This will ensure optimal guiding at all times. (If not switched on AAP will adjust and re-use the calibration data based on the mount DEC. This will not work on an alt/az mount).
- Guide stability and Dither settings can be set as you wish independent of mount type. I will not go into details here.
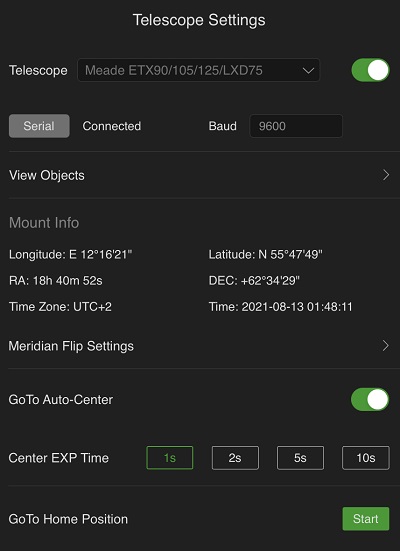
Telescope Settings
- Select the Telescope – Mount from the drop down list. The Mount is only visible if connected and powered up. Select the driver matching your mount. For the Panther Mount use “Meade ETX90/105/125/LXD75” and baud rate 9600.

- Meridian flip settings: No need to worry about these settings with an alt-az mount.
- Goto Auto-Center: If you switch this ON AAP will use plate solve to center objects precisely. The exposure time for the short exposure to be plate solved is set up. Often 1 sec is a good value, but if very few stars are visible increase the exposure time.
The filter wheel is not in use.
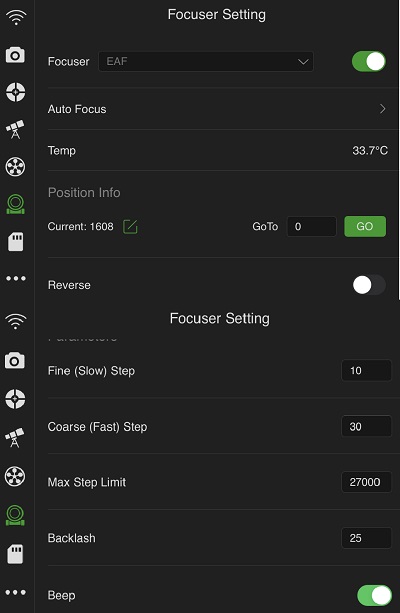
Electronic focuser
- Select the Electronic focuser from the drop down list. The focuser is only visible if connected and powered up.

- The other settings for the EAF focuser is out of scope for this post.
- If you don’t have an electronic focuser you can just focus manually.
This completes the settings that must be completed before you can start taking pictures with the AAP.
In the next PART 2 article I will bring the system out under the sky and start guiding and taking pictures of Deep Sky Objects.
Summing up
Setting up the AAP for use with an Alt-Az mount is almost identical to setting it up for a polar aligned mount (German Equatorial). There are only 2 things to focus on:
- Meridian flip settings: Don’t worry about these settings. Meridian flip will not happen on an Alt-Az mount.
- Guide settings – Auto Restore Calibration: This must be switched off to allow for calibration of the guider for each new target.
PART 2 Article – How to take the first images
I hope you found the article interesting. If you have any comments or suggestions send me an email at nth@trackthestars.com.