In this post I will introduce a technique to test your telescope/camera system independant of the telescope mount and at the same time get information about your mount – if you have any questions or comments send me an email.
What you can learn from this post
- The sky area around the celestial pole rotates very slow
- How untracked pictures of this region shows the true optical performance of your telescope.
- Find the guide tolerances needed to get pin point stars with your setup
- How to analyse your star images/profiles using PixInsight
- Relevant for all kinds of AP mounts (Alt/Az, Polar aligned, Dobsons)
Introduction – the stars are not pinpoint in my image
I am sure you all have tried to look at a raw frame from your camera where something is wrong. The stars are not nice and pinpoint as they are supposed to be. The problem can either be related to the optical system, or to the tracking accuracy of the mount. It can be difficult to identify exactly where the problem lies and often it is a combination.
In this post I will explain a way to get the mount/tracking errors out of the equation. That will make it easier to examine the other error sources and can tell something about how the mount performs too.
The Polar region – where the stars stand still
The Earth rotates making the stars drift across our sky from east to west. The rotation axis of Earth – the Polar axis – holds its precise direction in the universe, always pointing towards the same point of the sky. In the Northern Hemisphere this is a point very close to the star Polaris and in the southern hemisphere it is close to a quite faint star Sigma Octanis.
The part of the sky, exactly where the earth axis is pointing, does not move at all. Objects placed away from this point will move around the point in circles. The further away the larger the circle. The largest circle is at the celestial equator.
The polar region is a great test region:
- Always visible,
- Always in the same altitude
- Always in the same direction (relative to local light pollution)
- The stars stand still
Aim your telescope at the Polar region
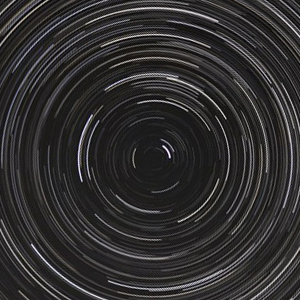
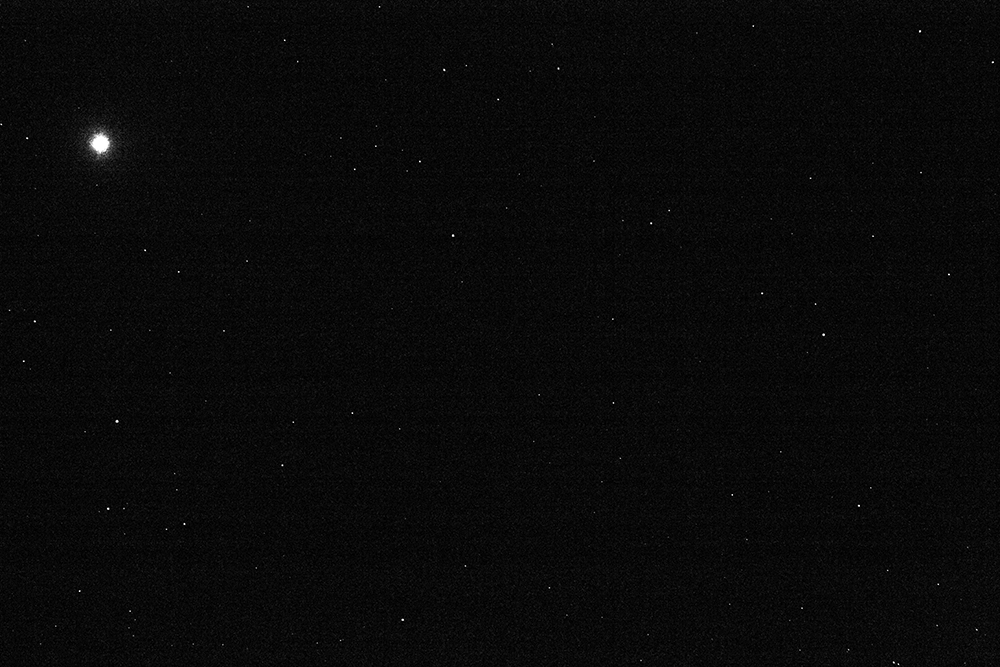
If you aim your telescope at the celestial pole and take a long exposure image with the mount drive turned of it will look like this.
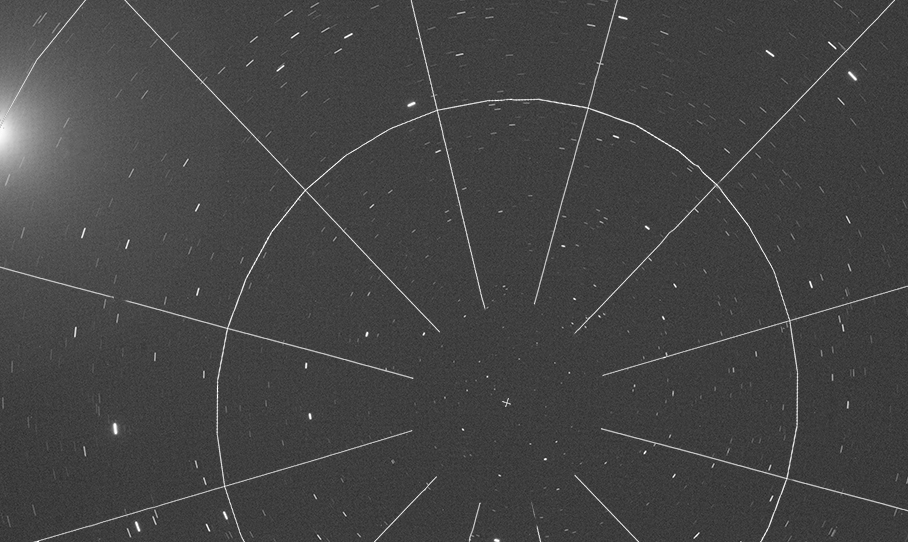
And here with a coordinate grid overlay to show where the exact pole is. The bright star far left is the pole star.
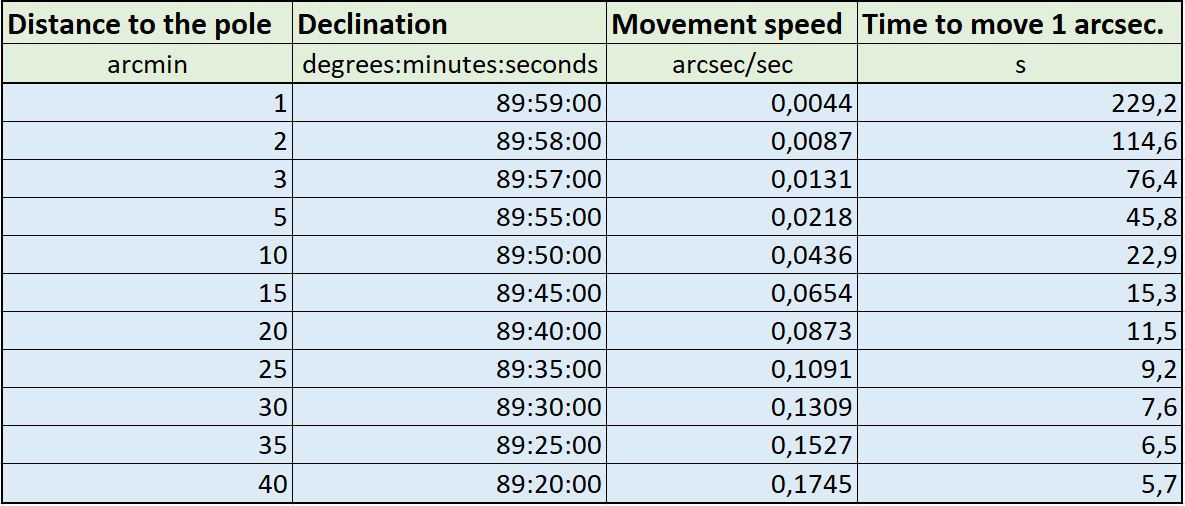
How fast do the stars rotate around the pole
The speed of the stars depends only on the distance to the pole or their declination. This table show the speed.
Take a number of test images
Here is a step by step procedure to take the test images:
- Point your telescope at the Pole star and focus carefully.
- Point you telescope at the celestial pole (declination 90 degrees)
- Take a test exposure of 5 minutes length and examine it carefully. By looking at the star trails it is easy to spot if you are pointed at the pole. Re-position as needed.
- Turn of the mount.
- Take a number of exposures in the exposure range: 1 s, 3 s, 6 s, 9 s, 12 s, 18 s, 24 s, 30 s, 60 s, 150 s, 300 s
That’s it. Now you are ready to analyse the results.
A quick visible inspection of the images
Start looking at one of the images with 1 sec or 3 sec exposure time. If you look at stars within 40 arcmin from the celestial pole they should all be pinpoint. 3 sec exposure will give a movement of 0.5 arcsec of the stars 40 arcmin from the pole and closer it is less. Very few amateur telescopes will show a star as elongated if the star has moved less than 0.5 arcsec. So any elongated or strange shaped stars will come from optical issues and not from guiding issues.
 If the stars are not pinpoint through out the image you need to examine why that is so. It is not in the scope of this post to go into details about this.
Hopefully your star images are nice and round in the center of the images. These can be used to further evaluate your system as described below.
A detailed study of a test image
The quick visual inspection of a short exposure image will show if the stars looks round. But it will not tell you how precise you need to guide to get nice round stars. A more detailed study of one of the longer exposures will tell you just that.
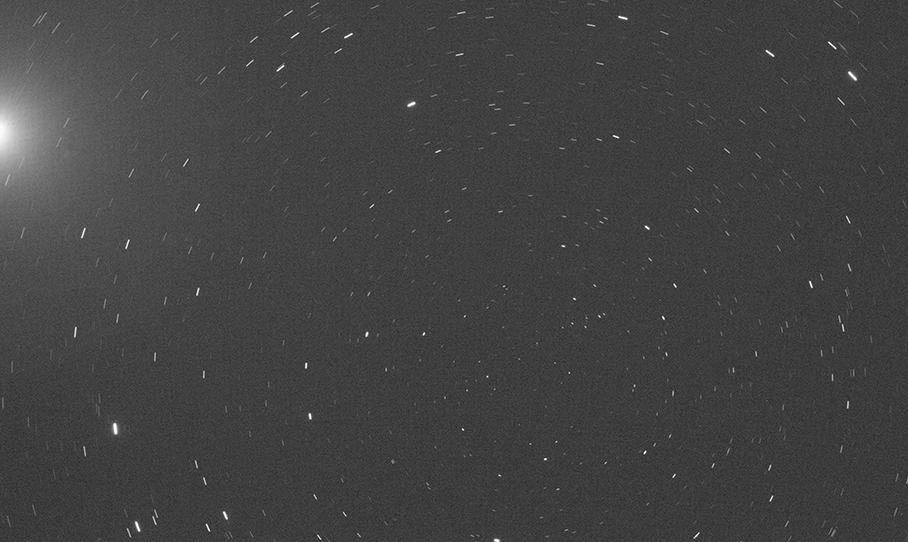
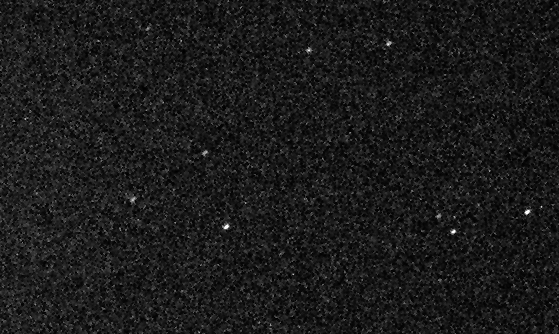
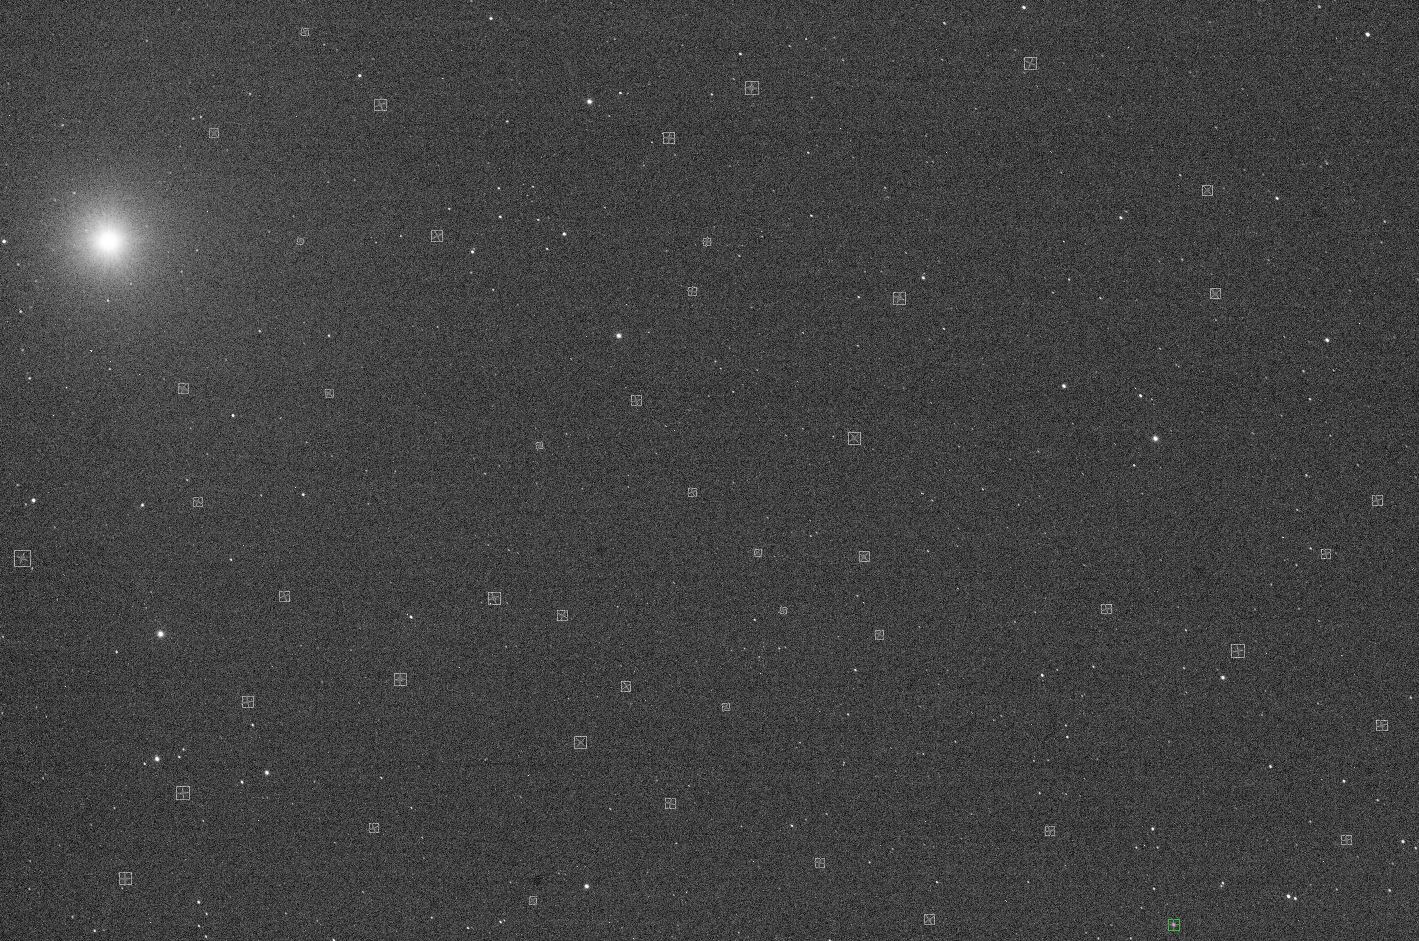
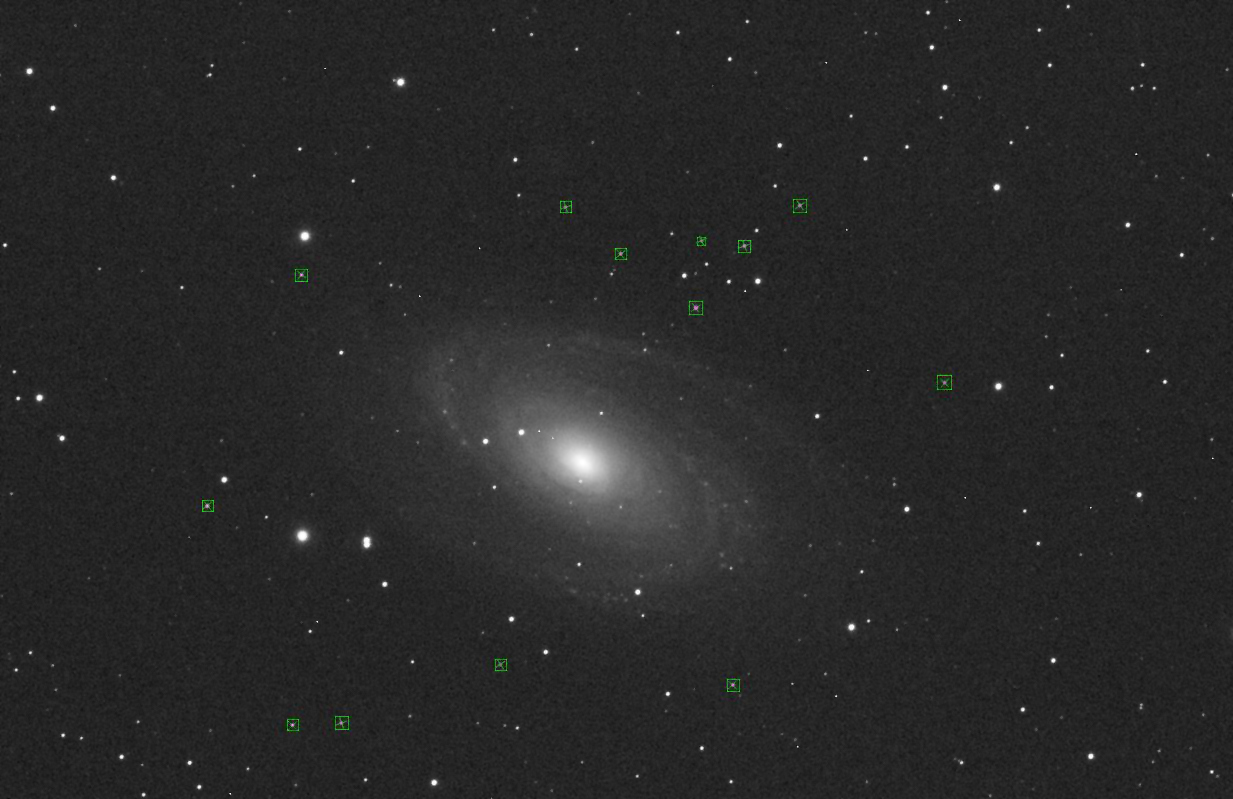
Here is a 30 s exposure of the polar region.
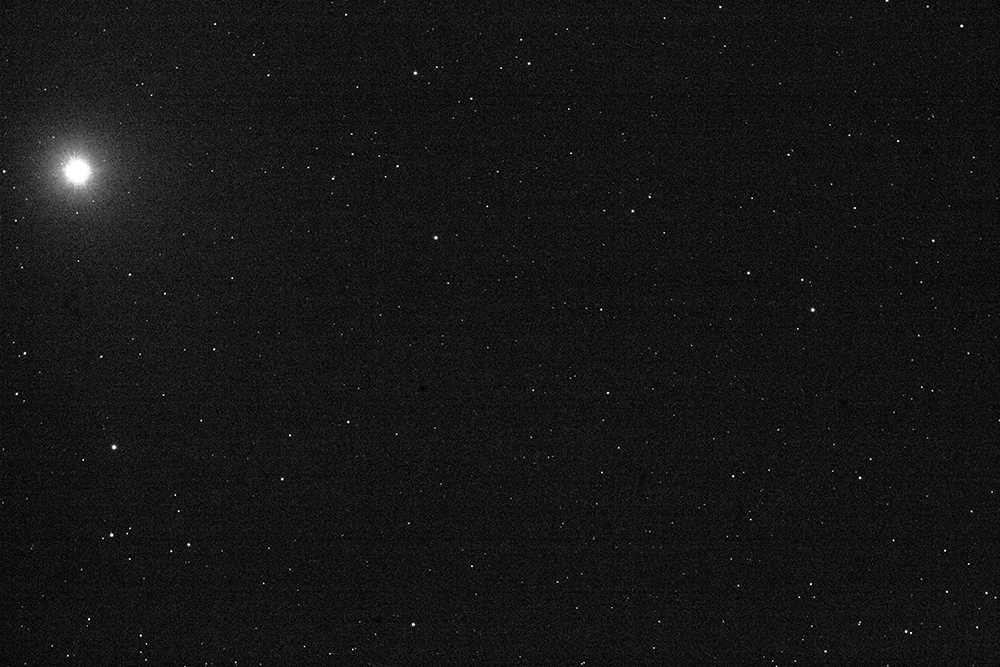
At the first glance it looks like the stars are pin point but a closer look away from the celestial pole shows elongated stars:
To get a more precise measurement of the star sizes and elongation I loaded the image into PixInsight and used the “Dynamic-PSF” (point spread function) to measure selected stars. Before using the PSF function I ran the “Image Solver” script. After this Astrometric solving the RA and DEC of each star measured is available making the analyse much simpler.
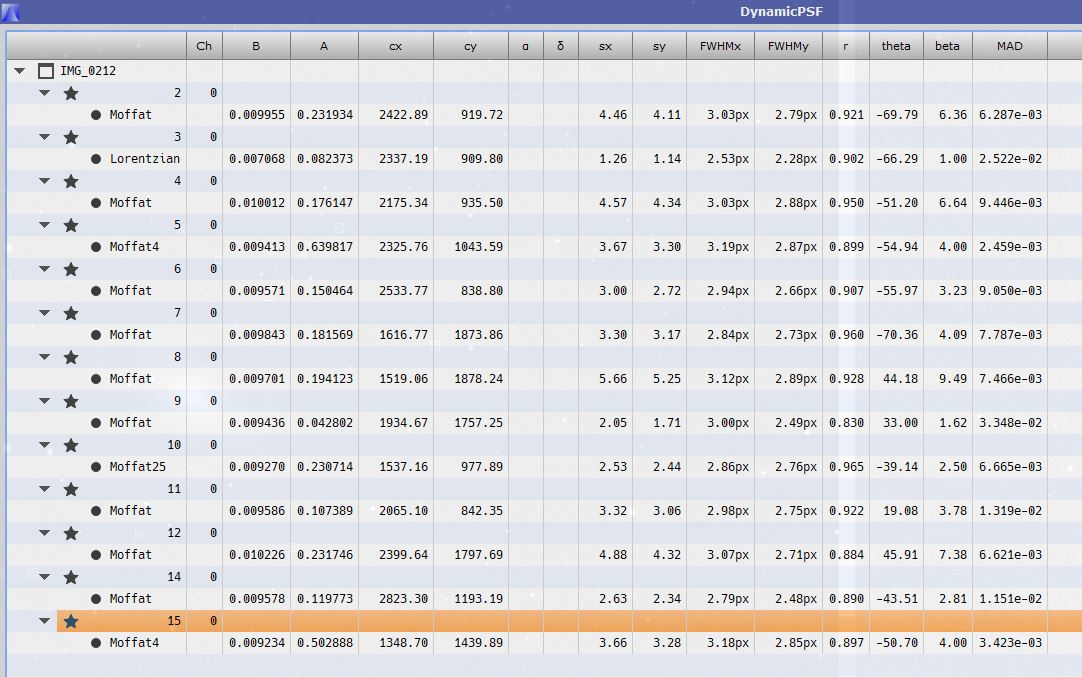
Here you can see the 50 stars I measured and how the data look in the PSF table (only first 8 stars shown):
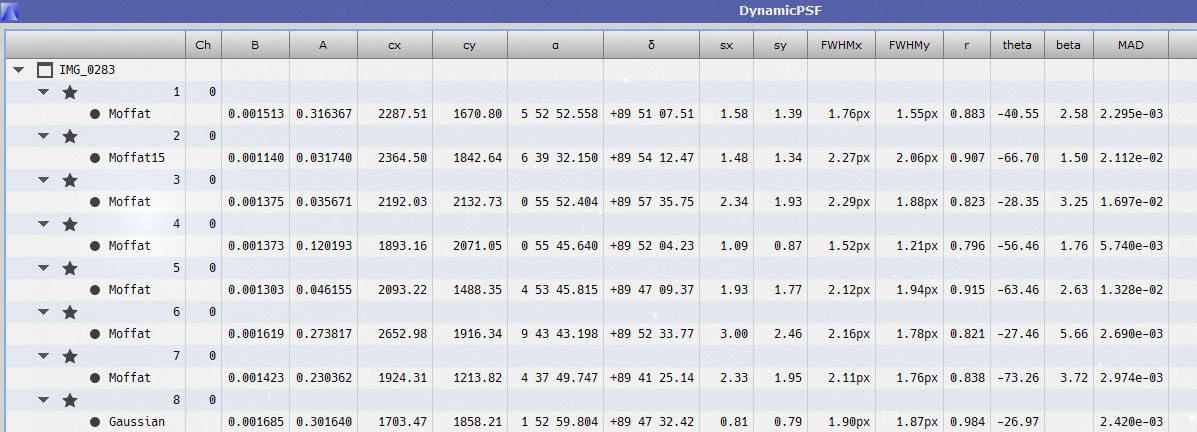
The PSF data was saved and imported into excel for further analyse. First I made a chart showing the Aspect Ratio of the stars relative to the distance to the pole. The Aspect Ratio is the short axis divided by the long axis of the elongated star.
Look here for details on aspect ratio in Pixinsight.
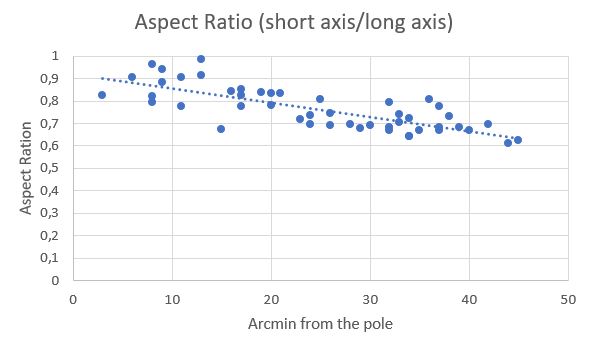
Based on the information in the table about star movement speed it is possible to calculate the distance each star has moved during the 30 s exposure. Therefore the above figure can also be shown as this:
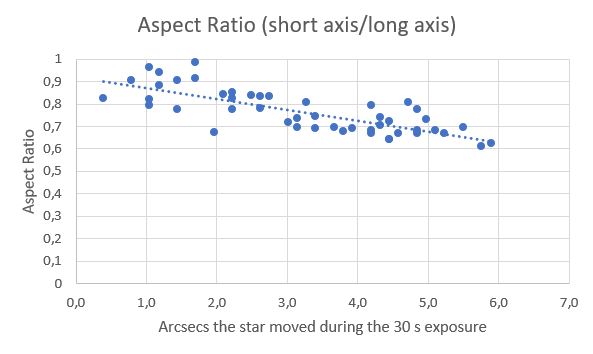
It is normally said that an Aspect Ratio of 0.9 er higher will show the star as perfect round. Therefore we can conclude that the max acceptable movement of a star is:
Less than 1 arcsec.
NOTE: This is the value that matches the setup I have tested here (TEC140 APO 980mm fl, Canon 1100DA camera). For other telescope/camera combinations the values will be different.
The data from the PSF function in PixInsight also contains FWHM of the two axis of the elongated stars. Based on this information I have made a plot showing the average FWHM value compared to the distanced moved by the star.
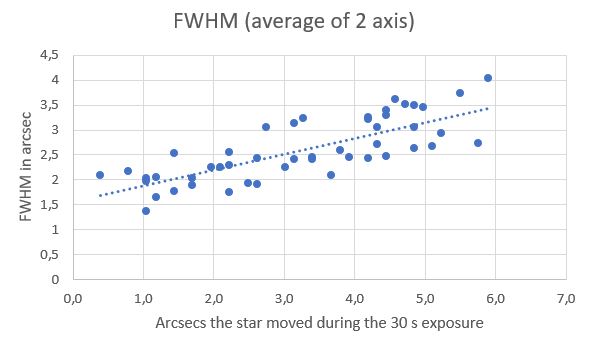
Again it looks like the maximal acceptable star movement is around 1 arcsec.
Now test your mount and guiding
Based on the test images of the polar region you now know what size of FWHM you can achive with your system – of course with the seeing on the night of the test.
If you now take images of similar exposure time of a normal target with your mount tracking (and guiding) you can compare the star sizes and elongations and it will tell you if your mount tracking deteriorates the image quality possible with the optical system. I will recommend you try to take images of both the polar region and the normal tracked target on the same night and fast after each other to minimize seeing differences.
Tracked and guided image
To compare with the test images of the polar region an image of M81 is used. It is 300 s exposure with TEC 140 APO fl 980mm and Canon 1100DA. Tracked and guided on TTS-160 Panther Mount with rOTAor.
And here follows PSF data:
The Aspect Ratio is very good above 0.9 on average and the average FWHM is around 2.9″.
Summing up
By taking images of the polar region with your mount powered off you can see the full potential of the optical system. Try to compare these images with normal tracked and guided images from your setup. Any deterioration of the images must be due to the mount tracking.
I hope the idea of using the Polar Region for test purposes has inspired you. I am certain there are other ways to use this not-moving part of the sky. Let me know if you have any ideas. You are welcome also to join the Facebook group related to this blog.
Posted Tuesday 10th December 2019, Niels Haagh, @Astrodane